
Organizing events and building courses
Create a club first
Section titled “Create a club first”Every course and event belongs to a club. If you don’t have one yet, create one from the course-creation screen — you’ll be its first Admin.
Build a course
Section titled “Build a course”From Courses, start a new course and click the map to place your start, controls, and finish. Two course types are available:
- Line — a fixed order; athletes punch controls in sequence.
- Score-O — any order; each control is worth points, and athletes plan their own route within a time limit.
You can also import a GPX track instead of clicking manually, and set a custom punch radius or control codes per checkpoint.
Import or export a course
Section titled “Import or export a course”Already have the course in another program? Import course file on the course editor reads a course exported from Purple Pen, OCAD, or anything else that speaks IOF XML — and MapRun KML files too. The format is recognised automatically, the controls land on the map, and nothing is saved until you’ve reviewed them and pressed Save.
It works the other way as well: every course page can export the course as IOF XML (for Purple Pen, OCAD, MeOS, UsynligO and friends) or as MapRun KML, from the ⋯ menu next to the course’s buttons. One caveat for MapRun: its files carry no punch radius, so set the event tolerance when you upload the course there.
Moving a whole archive of maps and courses from another system? More about import →
Describe the course
Section titled “Describe the course”Give the course a description — on the Description tab while you are creating it, or later from Edit course — in as many of the six languages as you like, with images if they help. This is where the boundary of the area, out-of-bounds ground, hazards, and required crossing points belong, so every athlete reads them before they start. Individual controls can carry their own short note too, for anything that needs saying at one particular control.
A course description stays with the course, so it carries over to every event built on it and to anyone running it as training. See Proper courses for what belongs in it and what makes a course worth running in the first place.
Add a map
Section titled “Add a map”Upload an image of your club’s own map and drag its four corners onto the real-world map to align it — this overlay shows on the course editor and on athletes’ run pages. You can adjust the overlay’s transparency while lining it up, and re-georeference or replace the image later without losing the course underneath it.
Create the event
Section titled “Create the event”From Events, create an event and attach your course. Choose Competition (scored, results count toward standings) or Training (open practice, no ranking), set the registration window and start time, and decide whether individual entries, team entries, or both are allowed. Add a description — in as many of the six languages as you like, with images — so entrants know about parking, start procedure, and terrain.
Categories
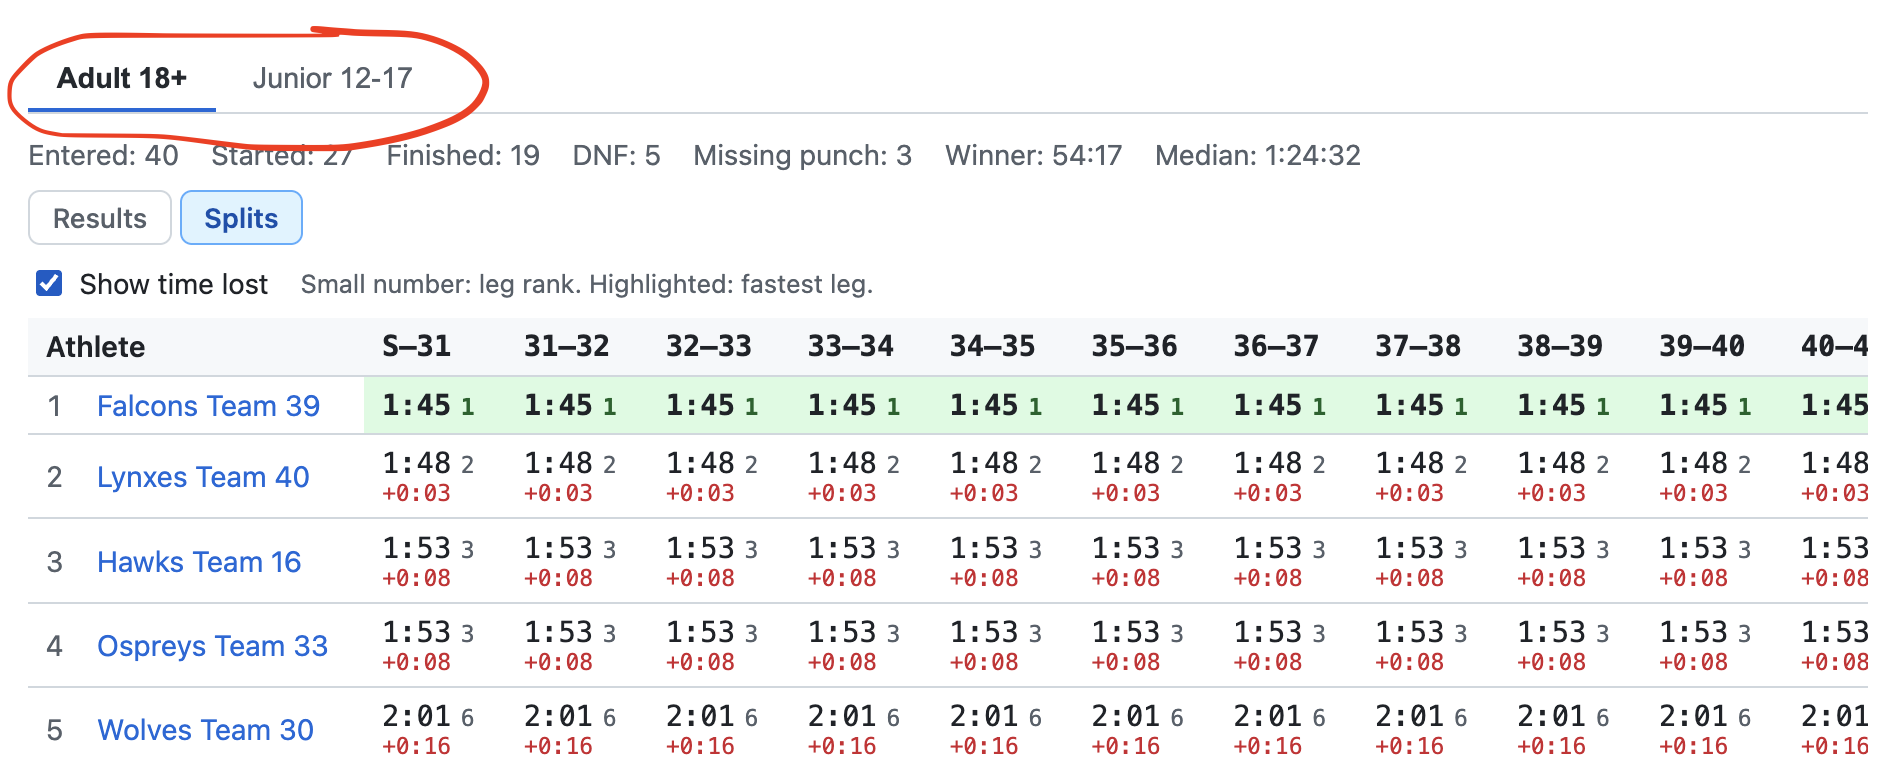
Section titled “Categories”One event can run several categories side by side — “Adult 18+” and “Junior 12-17”, or “Long”, “Short” and “Families”. Each category has its own name, a short description and its own course; categories may also share a course and still be ranked apart. Add them with Add category next to the course when creating or editing the event, or later from Categories in the event’s ⋯ menu, where you can rename, reorder or remove them (a category with entries can’t be removed or switch course). Runners pick their category when they enter, and you can move an entry to another category until that runner starts. Under Advanced settings a category can have its own spots limit with its own waitlist, start window, team or individual entry, and Score-O time limit — leave a field blank to use the event’s. An event with a single category looks and works just as before.
Results, statistics and splits
Section titled “Results, statistics and splits”With more than one category, the results show a tab per category, and each is ranked on its own. Above the table, a one-line summary counts who entered, started, finished, did not finish or missed a punch, with the winning and median times. Switch to Splits to compare every leg across the category’s runners: the fastest time on each leg is highlighted, the small number is the runner’s rank on that leg, and Show time lost adds how far behind the best each runner was. On a Score-O course, Splits shows who reached each control and when. Messages to entrants can also be sent to one category only.
Choose how controls are punched
Section titled “Choose how controls are punched”The event’s Punching field decides how athletes punch their controls:
- GPS only (the default) — athletes punch by being within a control’s radius; nothing to print.
- QR codes only — athletes scan the QR card at each control. Good for schools, indoor or urban courses, and places where GPS is poor.
- GPS or QR code — either works, so you can hang cards just where GPS struggles.
- GPS and QR code — the strictest: athletes must scan the card while their GPS shows them within the control’s radius. Meant for competitions.
Whichever you pick, there are still no electronic units or base stations to buy. A QR scan made far from its control is accepted but flagged for you.
Print the QR codes
Section titled “Print the QR codes”Every control on a course has its own QR code, with a short code such as K7P3-QXA9 printed under it for typing in when a card can’t be scanned. Print them from the course page’s ⋯ menu → Print QR codes, in one of three designs:
- Control card — A6, four per A4 sheet: an orange-and-white flag with a big control number.
- Sticker — 6 × 8 cm, nine per A4 sheet, for permanent courses; print them on weatherproof label stock.
- Beginner sheet — A5, two per A4 sheet, with step-by-step instructions.
Any ordinary printer will do. One set of cards serves every event on the course, and anyone training on it solo can punch by GPS or QR, so stickers on a permanent course just work. If a code gets around, Regenerate all codes replaces every code on the course — or New code just one control’s — and the old prints stop working.
Limit the field
Section titled “Limit the field”Max registrants caps the event by people, not entries: a team of four takes four of the places. Once it’s full, further entries join a waitlist and move up automatically, in the order they arrived, whenever someone withdraws — you don’t have to manage the queue. You can still approve a waitlisted entry yourself to let it jump ahead, or reject one to clear it. Raising or lowering the cap later re-settles the waitlist against the new number. Min and max team size bound how big an entering team may be.
Choose what’s visible
Section titled “Choose what’s visible”Results visibility decides who may open an individual athlete’s splits, GPS track, and map: everyone, only people registered for the event, or only your organizers. The leaderboard itself stays public either way. You can also stop the event’s location appearing on the public map before it goes Live, for courses whose start point you’d rather not reveal in advance.
Take it live
Section titled “Take it live”An event moves through Draft → Open → Live → Closed → Finalized. Open registration when you’re ready to accept entries, go Live when the event starts (this is when the individual control locations become visible to athletes — the course’s start point is already on the public map before then, unless you turn that off), and Close it once everyone has finished. Finalizing ranks every result and locks the leaderboard.
While the event runs, Watch online on the event page shows every runner on the map. Its time bar lets you drag back to any moment, or press ▶ Play to replay the race at 10×, 30×, 60× or 120×. Tracks stay available after you Close or Finalize the event, so you can use the replay for a debrief — with the same visibility rules as results.
Message everyone entered
Section titled “Message everyone entered”From the event’s Registrations page you can write to your entrants in one go. Pick the audience — the approved entries, the ones still awaiting approval, or everyone entered — and Checkpoint shows how many people each choice actually reaches, counting people rather than entries, so a team of four counts as four. Anyone who has withdrawn or been declined is in none of them.
Each person receives it as a private message about the event, not a group thread: they never see who else was written to, and a reply comes back to your organizers only.
Tick Send as an announcement for something that isn’t an invitation to talk — a final start list, a change of parking. An announcement goes out under the event’s name instead of yours, and nobody can reply to it. Leave it unticked and the message comes from you by name and can be answered.
Share the event
Section titled “Share the event”Share on an event, course, club, or map gives you a short link, a Share via… button on a phone, and a QR code to download. Pasted into a chat app or a social post, the link opens out into a card with the name and details rather than a bare address; printed as a QR code it goes on a flyer, a start list, or a control description. The address stays valid if you rename the event later, so printed material doesn’t go stale.
After it’s run
Section titled “After it’s run”A course with recorded results is locked in place — you can still edit its name, description, and visibility, but not its layout. Need to change the layout for a future event? Duplicate the course first.